Friday, November 29, 2013

Popsicle Stick Bridge Part 5 - Stitch Columns - G-Scale Train Garden Railway

We are going to be making 12 stitch columns.  four of the columns are going to be 12 1/2" long and the other eight are going to be 13 1/2" long.

For each stitch column we are first going to have to make two 'C' Channels.  These are made with stir sticks for the center and split-in-half stir sticks for the sides. Making 'C' Channels can be tricky work with the small parts and trying to use clamps on the slippery glue. Knowing a stir stick is 3/8" wide I use a 1/4" square dowel and electrical tape the split-in-half stir sticks to either side. (If you do not have a 1/4" square dowel, sandwich a bunch of stir sticks together making sure the glue is dry before you use it)

 photo 01-C_Channel1_zps4027792f.jpg

With the small sticks spread apart you can easily glue you stir stick between them.

 photo 02-C_Channel2_zpse296d300.jpg

After the first section has dried you can eliminate the square dowel and connect the sticks like before.

www.gscaletrain.blogspot.ca #3 11-29-13 photo 03-c-channel3_zpsca37fba1.jpg

Remember to stagger the sticks while you make the 13" length of channel

www.gscaletrain.blogspot.ca #4 11-29-13 photo 04-c-channel2_zpsbb502e22.jpg

After the glue has dried, take the time to lightly sand the sharp edges. Place a 3/8" square dowel between the 'C' Channels them clamp them back-to-back together.

www.gscaletrain.blogspot.ca #5 11-29-13 photo 05-IMG_3936_zps709d91da.jpg

Starting on the side of one channel make marks 1 1/2" apart.  On the other side, stagger them starting at 3/4" and marking 1 1/2".

www.gscaletrain.blogspot.ca #6 11-29-13 photo 06-IMG_3934_zps80f91707.jpg

Putting that aside, use a stir stick split-down-the-middle, mark it every 1 inch but starting a bit from each end. 

www.gscaletrain.blogspot.ca #7 11-29-13 photo 07-IMG_3938_zps2cd08f7a.jpg

Using scissors cut diagonally (45 degrees) at the 1" marks going the same direction.

 photo 08-IMG_3939_zpse9c06e4a.jpg

Cut off the sharp ends at 45 degrees the opposite directions and glue the ends on either side of the 1 1/2" marks on the 'C' channels.  With the wet glue you can maneuver the stick so they join nicely together.

www.gscaletrain.blogspot.ca #9 11-29-13 photo 09-IMG_3942_zps82b7098e.jpg

Continue the length of the one side leaving the last 3/4" of the structure bare.

www.gscaletrain.blogspot.ca #10 11-29-13 photo 10-IMG_3943_zps50ca4886.jpg

Let the glue sit overnight.  The next day remove the clamps and remove the 3/8" square dowel to mark the other side in the opposite spots at 1 1/2" to repeat the steps to finish the other side.

www.gscaletrain.blogspot.ca #11 11-29-13 photo 11-IMG_3945_zps845749fd.jpg
In the following photo, we glued a 1" long strip stick to the ends.  Fill the inside of structure with either a 1/4" slice of the 3/8" square dowel or sandwich a bunch of stir sticks until it is flush with the other side. Dress either side with a 3/4" long piece of stir stick


 photo 12-IMG_3959_zpsd72bc5c7.jpg

Once everything has dried, it should hopefully look like this

 photo 13-IMG_3969_zps4ea28b20.jpg

Next we are going to insert 3/4" length of 1/4" round dowel in the top of our columns for added surface contact when we attach the top sandwich beam. Drill a hole in the top block

14 photo 14-IMG_3970_zps84ef0f33.jpg
15 photo 15-IMG_3971_zps29e1519f.jpg


Put glue on one half of the dowel and insert into the top of the stitch column.

16 photo 16-IMG_3972_zpsbcfd6298.jpg

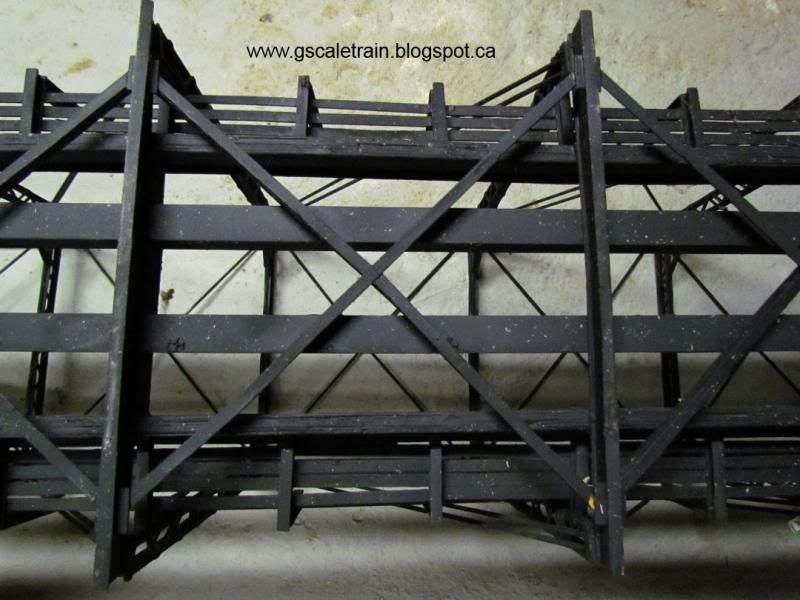
Using the base structure, we are going to glue the 13 1/2" columns on the end of the middle four cross beams. The shorter columns are glued outside of those leaving the end and the first cross beam positions empty.

Next Bridge Blog we are going to talk about the Triangle Joists for the top.


SEE THE PREVIOUS BLOG - HOW TO BUILD A G-SCALE TRAIN POPSICLE STICK BRIDGE - Part 4 - CLICK HERE

CLICK HERE TO SEE THE FINAL PRODUCT - G-Scale Popsicle Stick Train Bridge

CLICK HERE TO GO TO PART 5

Saturday, November 23, 2013

G-Scale Train Garden Railway 11-22-13 VIDEOS


Reflecting on our older blog entries, we came across what our layout looked like in 2010 of November - CLICK HERE.   Bob decided to take some up-to-date videos. He shot the videos at dusk to feature the new lighting he had installed.   Enjoy :)


Saturday, November 16, 2013

Popsicle Stick Bridge Part 4 - 'L' Channels & Base Cross Supports

These nine bottom cross braces are going to be made exclusively from the stir sticks.  Starting at the center on one stir stick, glue two others to the edge leaving a small gap. 

 photo 01-L_Beam1_zps79de5f3b.jpg


Cradle the seam in the center of the circular indentation of the clothes pegs finding that 'sweet spot' that holds the sticks together at a 90 degree angle.


2  11-16-13 G-Scale Garden Train Blog photo 02_L_Beam_zps39f91445.jpg


Staggering the sticks using half-length sticks at the end to finish the 13" length.


3  11-16-13 G-Scale Garden Train Blog photo 03_IMG_3950_zps491106ac.jpg


After first 'L' Channel has dried, glue at the center a stir stick in the center of the gap we left before. 


4  11-16-13 G-Scale Garden Train Blog photo 04_IMG_3951_zps34458511.jpg


Build another 'L' Channel at a 90 degree angle to the first picture staggering the sticks and using lot of clothes pegs to hold it together until the glue dries.


 photo 05-IMG_3961_zpsed86aca5.jpg


Draw a 45 degree cut line along one edge and cut extra/uneven material off with a hand saw or jigsaw.


6  11-16-13 G-Scale Garden Train Blog photo 6-IMG_3964_zpscb8b0dc4.jpg


Measure the 9" distance between each end of the 'I' Beams on the previously built base structure.  You will find each dimension is different.  Custom cut each cross brace to fit perfectly inside each of the "I" beams. 


Glue a 3/4" length of stir stick to the bottom of the 'L' channels to create a base plate.   This creates additional joining surface to glue the cross braces to the 'I' Beams.


7 11-16-13 photo 7b-IMG_4190_zps23329815.jpg


The cross bracing should attach about 1" from the ends of the 'I' Beams.


 photo 8-IMG_3914_zpsd522090c.jpg
9  11-16-13 G-Scale Garden Train Blog photo 9-IMG_3913_zps4a72bade.jpg


That concludes the construction of the base structure. 
Next Bridge Blog we are going to talk about 'C' Channels & Stitch Columns.


CLICK HERE TO GO TO THE NEXT ENTRY on HOW TO BUILD A POPSICLE STICK BRIDGE - Part 5

CLICK HERE TO GO TO THE PREVIOUS "How to Build a Popsicle Stick G-Scale Train Bridge - PART 3 - Sandwich Beams 

CLICK HERE TO SEE THE END RESULT of The Popsicle Stick G-Scale Train Bridge


Saturday, November 9, 2013

Electrical for the G-Scale Garden Train Railway - 11-09-13

(Blog entry by Bob)

The great thing about a battery powered train set is that you do not have to run wires or worry about broken circuits... except when it comes to lighting.  We have x4 different types of electrical circuits in the train layout and sometimes I have to take a break from weeding to keep everything working.
The first is solar.  This is the easiest one to manage even though the dollar store lights usually stop working after a year. Not only do we have solar streetlights..

 photo 01-IMG_4142_zps7812b7f8.jpg

and solar spotlights..

Electrical 2 www.gscaletrain.blogspot.ca photo 02-IMG_4143_zps56cfe26a.jpg

Electrical 3 www.gscaletrain.blogspot.ca photo 03-IMG_4141_zps24db8366.jpg

but we also a solar pump to circulate the pond.

Electrical 4 www.gscaletrain.blogspot.ca photo 04-IMG_4139_zps3c662bc4.jpg

The other three power supplies are stored in the garage.

 photo 05-IMG_4134_zps53d25736.jpg

There is 120-volt (yellow extension cord) for the high flow pump that runs the waterfalls every 2 hours during the daytime (Spring & Summer).  CLICK HERE TO SEE WATERFALL BLOG 
[Up Shiltz Creek in G-Scale Land - Part 2 Waterfalls - 06-01-13]
 It is on a timer plugged into its own Ground Fault Recepticle. A 3-volt power supply (small black transformer plugged into the white cord of the left and Two 18-volt power supplies - big train controllers running wires off of auxillary terminals)  They all run off a separate timer and Ground Fault Recepticle. The lights turn on at 6:00 am to 7:30 am and turn on again from 6:00 pm to 10:00 pm The 18-volt and 3-volt run in 4 wire telephone cable that runs out of the garage and into the layout. 

 photo 06-IMG_4138_zps76a74a9e.jpg

Cables are tucked under either concrete slabs, the shingles of the track bedding or the rubber tiles of the road.

Electrical 7 www.gscaletrain.blogspot.ca photo 07-IMG_4137_zps894d1f56.jpg

The 120-volt yellow extension cord ends under the brewery where it is married to the pump plug.

Electrical 8 www.gscaletrain.blogspot.ca photo 08-IMG_4140_zps33009a9c.jpg

The 18-volt and 3-volt zig-zags its way to every building where they are joined to the building lighting. 

Electrical 9 www.gscaletrain.blogspot.ca photo 09-IMG_4136_zps9439d66f.jpg

The first 18-volt power supplys runs the x18 lights that are in the residential side (north of the pond) and the second powers the x18 lights on commerical side.

 photo 10-IMG_3987_zpscfc8dd3a.jpg

In the new trailer park we are building, we have an animated campfire circuit.  It is probably designed for indoor use only so I encased the whole thing inside hot glue so the rain and snow doesn't affect it.  Look to future blogs for this to be shown. 

Electrical 11 www.gscaletrain.blogspot.ca photo 11-IMG_4135_zpsde4a8927.jpg

If you missed what the downtown looks like when it is lit-up at night we ran some pictures of it a couple weeks ago in the blog.

CLICK HERE FOR SOME ASSORTED BLOG ENTRIES CONTAINING NIGHT PHOTOS OF THE LIGHTING SYSTEMS IN THE LAYOUT

Saturday, November 2, 2013

How to Build a Popsicle Stick Bridge - Part 3 - Sandwich Beams - G-Scale Garden Train Railway

Now starts the exciting part of building the bridge. Though my bridge is over 2 years old and now painted black, I did not have a need to replace it so for these blogs I have only created a small cross-section to showcase the building of each part.  The foundation of the bridge is four 6'-9" long sandwich beams.  These are created with tongue-depressors glued together 6 sticks thick.

 photo 01-EPSON012_zpsf548e51e.jpg

Start by cutting some of the sticks in half and stagger the rows of sticks by gluing a full length stick to a half like layers of bricks.

02 photo 02-sandwich_zpsb684689e.jpg

It takes a lot of gluing to attach hundreds of sticks in a row, never mind doing it 4 times!!!  It took me 3 months of gluing in front of the television every other night to get them all done.  One of the biggest problems is getting them all to be straight.  You will also notice that the longer you make the beam the more flexible the whole thing becomes. My secret weapon was two 3/4" x 3/4" x 1/16" thick Aluminum 'L' Channels. 

I used the channels to place the wet glued  sticks inside while I clamped everything together (you can pry the metal away later).  By doing this everything will stay neat and straight. The long beams can be sanded later to remove blemishes.


03 photo 03-IMG_3977_zps2f86360a.jpg

When the 4 lengths are completed, cut the aluminum channel the length of the beam (6'-9").  Drilling a hole through the aluminum and the wood beam then bolt them together 1/4" from ends and every 2'-3" to strengthen the wood. 

04 photo 04-IMG_4181_zps4cf416c9.jpg

I did this for the two center beams because the train track sits directly on top.  I encased/hid the bolts with 4 stick thick sandwich beams at 2'-3" & 4'-6". The long sandwich beams at 2" apart on center so the in-between 4 stick beams were cut at 1 5/8".  I carved out the ends to fit around the nut and bolt to hide them.

05 photo 05-IMG_4183_zps9b376f9d.jpg

For the ends of the long beam I used a 6 stick thick sandwich which  gave me a great opportunity to tidy up uneven/ugly ends.
Underneath the ends attach 12" long 6 stick sandwich beam bolted inside 12" of aluminum channel.  This is the surface that the bridge will be resting on so don't be shy to use extra bolts and nail to secure it to the bottom of your structure.


06 photo 06-IMG_3912_zpse4a9dbae.jpg

Big 'I' Beams
The ten 'I' beams are going to be 12" long.  By now you have realized that the tongue depressors are 5 1/4" long and the stir sticks are 6 3/4" long. Marking the middle of the tongue depressor glue the edge to the abutting stir sticks.

07 photo 07-I_Beam1_zpsbd2aea3a.jpg

Cupping the edges of the stir sticks in circular indents on the clothes pegs fasten the one side together with multiple clothes pegs.

08 photo 08-I_Beam3_zps09046d22.jpg

After letting it dry you can use the same method to attach the second side or you could break-out the big clamps.

09 photo 09-I_Beam_zps2fbb8136.jpg

Once all the 'I' Beams are done attach them to the bottom of our sandwich beams.  Go to center the 'I' Beams so roughly 2 5/8" project from each side. Each one is going to be 9" apart with the third ones lining up under the 4 stick cross pieces.  These are going to be glued and clamped in place. 

10 photo 10-IMG_4177_zps9e8ae9d3.jpg

Once dry, I use my precision hand drill to bore holes for HO track nails to prevent the popsicle sticks from splitting. 

11 photo 11-IMG_4184_zps877e49fe.jpg

I cut the HO track nails in half because they bend very easy when nailing them. I used 2 nails each side at each connection point since the contact surface is so small.

12 photo 12-IMG_4180_zps3ce73001.jpg

I realized I covered a lot of work but next Bridge Blog I am going to talk about 'L' Channels and the base cross supports to finish our base structure.


CLICK HERE TO RETURN TO Popsicle Stick Bridge - Part 2

CLICK HERE TO GO TO Popsicle Stick Bridge - PART 4

CLICK HERE TO SEE COMPLETED BRIDGE